
This first box is made with red clay, and it's another one with a little drawer... that fits perfectly fine, thank goodness. It stands about 5 or 6 inches tall.
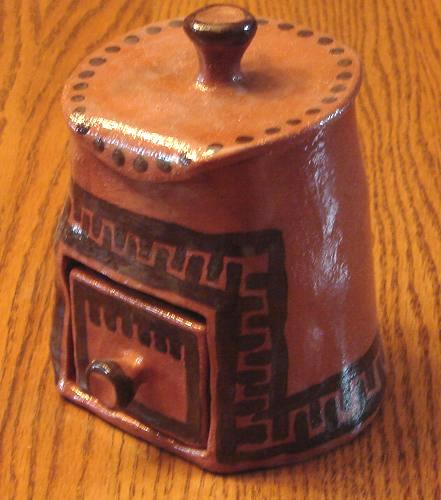
I painted on the exterior design and the interior bright yellow using underglazes. Underglazes are like colored clay and can go onto the piece before the bisque firing, which is what I did with this pot. Once the bisque firing was done, I just painted on clear glaze. Unfortunately, I tend to get a little heavy-handed with the clear... and it got a little milky in places.

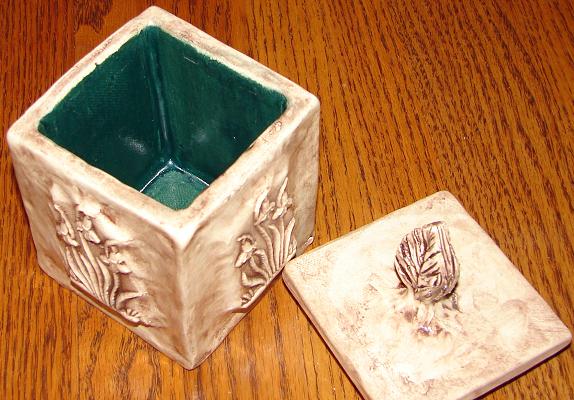
This next box pot is only about 3 inches square. I used a sprig mold at the studio, also known as a press mold, to create the floral design for each side of the pot. I used white clay, and once it was bisque fired, I painted on brown underglaze and then sponged off most of it, followed with a couple of coats of clear.
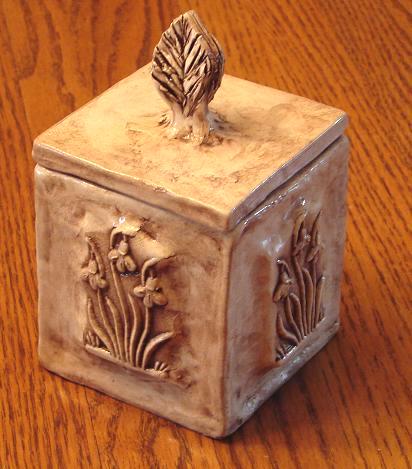
One of the sides blew off during the bisque firing, because by the time I finished this box pot, it had gotten a bit too dry. This was way before last Christmas... so I finished the piece that broke off (thankfully in just one piece) just like the rest of the pot and put it through the glaze firing too... and then I glued it on. It's noticeable, but the glazing technique I used is to make it look "old"... so what's a few cracks?...
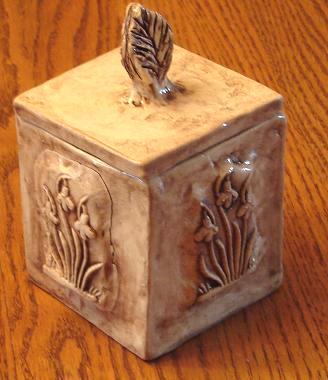
I painted the inside with a deep green glossy glaze, and it turned out a real pretty color. When I was making this pot, my sister, Kathy, suggested how to finish it, and she liked it when it was all done... so I gave it to her.
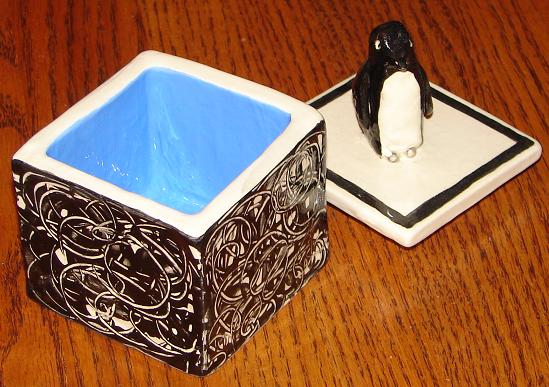
This next box pot is also about 3 inches square, and the little penguin stands about 2 inches high. All painted with underglazes. For the sides, I painted them all black and then took a tool and scribbled all over it, to show the white clay underneath. Once it dried well, I smoothed it out. The thing about little bits of clay, once it's bisque fired, it's sharp. And glaze firing only makes it more sharp.
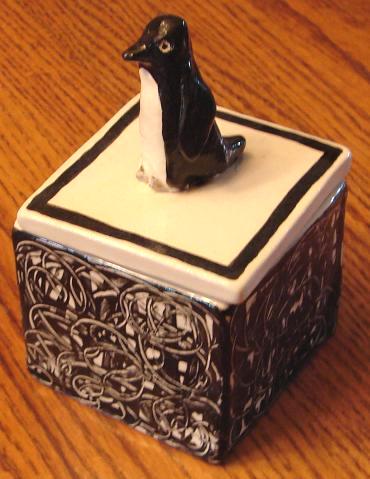
Had to make the inside blue, like the icebergs the penquins live on. Then just followed with clear glaze, this time, thankfully, not to heavy-handed, and the black stayed nice and crisp.
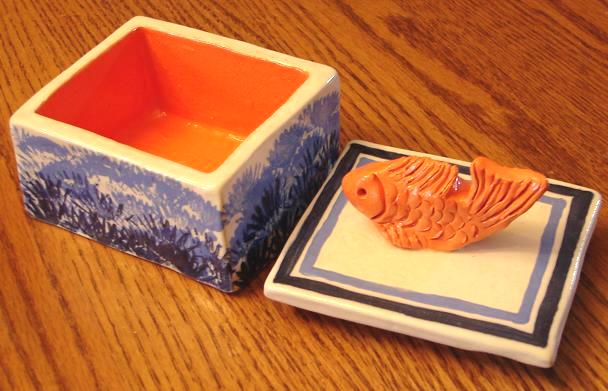
This box pot is about 3 x 4 inches and about 2 inches tall. I free-formed the goldfish (like the penquin), and I also used underglazes on the greenware.
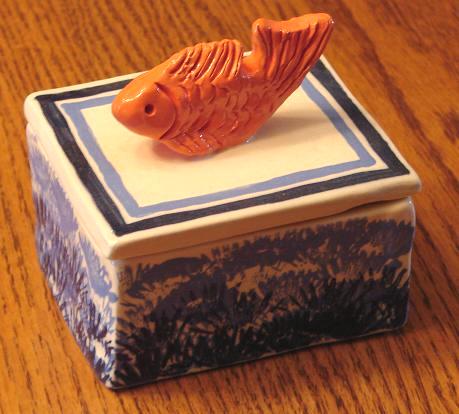
Followed by a clear glaze coat. On the sides, I used a fan-shaped paint brush and 2 shades of blue.
I still have a few more pieces to post pictures of, and right now in my shelf at the Studio, I have 5 bisqued fired pieces... a round dish and 4 critter shaker balls. In addition, I have 4 or 5 critter shaker balls waiting for bisque firing... so that means I have a bunch of glazing in my future. Also, I just brought home a finished bowl and another finished box pot.
For these critter balls, my goal was to make a critter that I can glaze mostly just one color, like this red guy with white eyes, who was inspired by photos I found on the web of North Carolina face jugs. A couple critter shakers that I just finished are weird looking like the face jugs.
When I make the balls, I used to just wad up newspaper and than start grabbing clumps of clay and forming it over the ball of newspaper... but recently I did 3 of them, and didn't get to finishing them all in time. The last one got a bit too hard to work with, so I tried to wet it again by putting damp papertowels over it and letting it set overnight. White clay isn't very cooperative that way. When I unwrapped it, the ball had collapsed. I was able to retrieve the shakers inside of it and put them back into my stockpile of shakers, and I took the too-hard clay and put it into a bag and wet it so I could the clay over. I noticed that some of the pieces were really too thick, and some were pretty thin.
I was more concerned about the too thick pieces... it's not good to have the clay too thick. That increases the chances of explosion in the kiln, and also, it's a waste of clay. So this time, I slabbed out a bunch of clay and made the balls by just cutting out pieces of the slab and fitting them over the ball of newspaper. It worked very, very well. Too well. I made 6 balls. I really had trouble getting them all finished into critters before they got too hard to work with. The last 3 were more like a chore than a fun time at the studio. Won't make the mistake of mass production of balls again. Will use slabbed clay for the balls from now on though. Very handy.
Also, since I am now a Clay Club Member at Space Studios, I love the freedom of going when I can, even if it's just for an hour. Some days, that's all the time &/or energy I have. But... I did the one-year membership, and I zipped through my 50 pounds of clay already. Had to buy a bag, and it's not very cheap. Well, when you think that all the firings and glazes come with it, it's likely pretty cheap. But I think I use a lot of clay... so making sure the shaker balls don't have portions that are way too thick is probably more important to me now. Not that it wasn't important before... truly I'm more concerned with pieces blowing up than cost of clay. Not only because my piece would be ruined, but my fear is that I'll be careless and my piece will blow up in the kiln and take out someone else's piece near it. That would make me feel worse than my own piece being destroyed.
One of the first things I like to do when I get to the studio is go through and look at all the pieces in progress and fnished pieces that are setting in the other shelves and in the kiln room. There are some very unusual, very beautiful, some very lame, and yes, also very ugly creations that come out of the studio. Some pieces are very simple and plain, but the glazing technique the person used is super creative. Some pieces are super creative and unusual. Those are my favorites, usually. Sometimes I will notice a glaze technique and I'll try to track down the person to find out how they did it. I've also had people ask me about my stuff setting on my shelf. Writing about this is making me wish the studio was open today! But it's close to 1pm here and we have a family picnic at 2pm, so I'd better go cook some peas up! (Yes, peas.) Adios.
Hi Aunt Julie! I love seeing all the pottery pieces on your blog! But, I must say that the penguin box pot is my favorite so far! Love, love, LOVE it!! Penguins are one of my favorite animals, and I am really impressed at how well yours turned out. Also like the blue and black together, and the "scribbles" are amazing! You are very talented!!!
ReplyDelete-Neice A.R.
Hi Alana! Thank you for your comment. I didn't know you had a thing for penguins... me, too. I loved that movie, "March of the Penguins" which is why I think I ended up making the penguin on top of the box pot. The scribbles were a happy accident...
ReplyDeleteHappy birthday tomorrow! (I think I know now what to give you for your birthday!)
Hope to see you sometime soon.
Love,
Aunt Julie
p.s. shoot me an e-mail so I have your e-mail address, ok?